Tuesday, December 14, 2021
NMAP - Network Mapper : Scanning Localhost
NMAP - Network Mapper : Scanning entire Network
NMAP - Network Mapper
To install NMAP use the following command
Monday, December 13, 2021
Installing Nginx Web Server in Ubuntu and a Quick Tour about it
Hi,
In this post we are going to see how to install Nginx web server and perform some actions on it...this would be a quick start guide for those who want to browse about Nginx.
The first and foremost...installating Nginx.
Use the following commands to install Nginx web server.
Well that is it all about the installation of Nginx...pretty easy right....
By default when you install Nginx, the web server would be up and running but when you found that web server is off...how would you turn it on? the answer is the command given below...
With respect to Nginx, the web server can be controlled by signals
- Signals
- stop : for fast shutdown
- quit : for graceful shutdown
- reload : to reload the configuration changes
- reopen : to reopen the log files
- restart : to restart the nginx web server
the signals given above are self explanatory and we will see how to use those signals in the following section
Nginx web server consists of module which are controlled by directives mentioned in the configuration file
There are two types of directives....
- Directives
-
Simple Directiveconsist of name followed by parameters with space separatThere are two types of directives....ed and terminated by a semi colon
-
Block Directivesame as simple directive but instead of terminating with the semi colon...this directive is enclosed by set of braces or paranthesis. if a block directive can have other directive other directives inside braces or paranthesis, then it is called context.
Directives placed outside of any contexts are considered to be a part of the main context.
The purpose of any web server is to serve contents which is requested through a URL. Nginx is no exception on that and the speciality about Nginx is that we can define the locations where the contents are stored to look for.
For instance, the html files can be served form the location called /var/www/html and the images can be served from a different location such as /var/www/images.
Nginx would be known about these locations via respective entries in the configuration file.
Let us try out some of the entries in the configuration file.
In order to server the html files from the location mentioned above... the configruation file should have a block entry named "location" inside the block entry "server" again which is inside the block entry "http", typically the entry should look like the one given below...
server{
location /login.html{
root /var/www/
}
}
}
Similar to the entry above, we can have a entry which serves images like the one given below....
server{
location /images{
root /var/www/images
}
}
}
Having said the above two configurations are in place and nginx server has encountered an url such as...
Now the nginx websever would refer the configuration details to identify the directory for contents, in this case the the directory would be /var/www and if the server finds the file login.html it would be served to the client.
For the next case assuming the login page referring an image and url for the image resource be like....
Now the nginx server would refer the images directory to server the file login.png.
Once we are sure about the configurations defined in the config file we should now let the web sever know about it.
To make the web server know about the configurations we have to load the configurations defined so far.... To achieve this let us reload the server using the command given below....
with this we can conclude the static content service provided by the nginx server.
Now we are going to talk about a important application of nginx server, which is nginx as a proxy server.
As we all know, a server can be used as a proxy for clients and for servers, to be precise nginx web server can be used as both forward proxy and reverse proxy.
Let us now touch upon these two concepts very briefly...
Forward proxy is a concept that is applied on the incoming request form the client for the server.... the proxy server sits in between the client and the actual server that does the real job, in which case the server does not know anything about the actual client.
what the proxy server does is... it intercepts the actual request from the client and mask the IP address as part of the request and forward the request to the actual server for processing.
Now for the actual server the client is the proxy server and not the actual client, the actual server does its work and generate the response and sent it back to the proxy server.
The proxy server receives the response, it unmask the IP address and sent it back to the actual client.
To be precise, forward proxy is for the client and not for the server and to be more precise the forward proxy would normally resides in local network and not on the internet.
Reverse proxy on the other hand is the concept applied on the response generated by the actual server.
Here the clients or the request creators does not know about the actual servers, from the client point of view the proxy server is the actual server that creates the response for the request.
This approach is to protect the servers form the malicious client access.
Rever proxy sits on the internet and not on the local network.
Nginx is designed to be a reverse proxy.
Let us see how these two are done in nginx.
Let us now see some examples how Nginx server can be used as a reverse proxy
server {
location /home {
proxy_pass http://localhost:8080/
}
location /images{
root /var/www/images
}
}
}
from the above example given, the first location uses the proxied server for the mapping /home and for serving images the mapping /images is used which is the local folder.
Another application of Nginx server is to proxy the fastCGI server where there application build on various frameworks and languages like PHP would run.
Taking the above configuration as a basis, we can have similar configuration for FastCGI proxying.
We will be using fastcgi_pass directive rather proxy_pass for FastCGI configuration.
server {
location /home {
fastcgi_pass localhost:8080
}
location /images{
root /var/www/images
}
}
}
Well with this we can conclude the installation of Nginx Server and its quick tour.
Let me know what you feel about this post through comments...
Monday, December 6, 2021
Installing TeamCity Continuous Integration / Continuous Deployment DevOps Environment
| Prerequisite(s) | ||||
|---|---|---|---|---|
| SNo | Name | Version | Download Page | Direct Link |
| 1 | Java | 1.8 or > | N/A | N/A |
| 2 | MySql | 8.0 or > | N/A | N/A |
| 3 | Team City | 2020.1 or > | N/A | Click to Download |
#!/bin/sh
### BEGIN INIT INFO
# Provides: TeamCity autostart
# Required-Start: $remote_fs $syslog
# Required-Stop: $remote_fs $syslog
# Default-Start: 2 3 4 5
# Default-Stop: 0 1 6
# Short-Description: Start teamcity daemon at boot time
# Description: Enable service provided by daemon.
# /etc/init.d/teamcity - startup script for teamcity
### END INIT INFO
# Ensure you enter the right user name that TeamCity will run under
USER="admin" ## CHANGE THIS USER NAME TO MATCH YOUR USERNAME
case $1 in
start)
start-stop-daemon --start -c $USER --exec ./TeamCity-2020-1/bin/teamcity-server.sh start
;;
stop)
start-stop-daemon --start -c $USER --exec ./TeamCity-2020-1/bin/teamcity-server.sh stop
;;
esac
exit 0
Sunday, December 5, 2021
Installing and Configuring Ansible DevOps Environment in Ubuntu
With this the configuration section of ansible is completed.
Let us try some command to see how Ansible works
Open a terminal and fire the commands below to see the output...
Friday, January 29, 2021
Setting up Linux Desktop Environment using Openbox Window Manager in Ubuntu
docky &
nitrogen --restore &
xcompmgr &
volti &
5.2 Click on the New Item again from the tool bar and name the new entry as Shutdown with command shutdown now
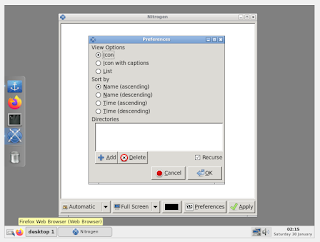
2. Now click and hold the anchor icon and drag to the any of the sides of the screen, in my case I would like to have the docker at the left hand side of the screen, the reference image is given below...
Changing the password of the root user of mysql in Ubuntu
Hi all, In this post we are going to see how to reset the password of root user in mysql As we all know the root user of mysql is some...

-
Many of us have been using Eclipse IDE since we started developing programs in variety of languages but as a developer we never bothered th...
-
Hi, In this post we are going to see how to install a fake SMTP server for our development/testing environment... Many of us as develo...
-
Hi, In this post we are going to see how to install a DevNull SMTP server for our development/testing environment... Many of us as dev...


