
Hi,
In this post I am going to discuss about how to use arquillian extension to perform integration testing on liferay plugins...
The following sections details the softwares used...
The environment where the above mentioned softwares were installed had fedora as operating system but the procedure that I am going to detail here is not restricted to any particular operating system and also I am not going to discuss the installation of above mentioned softwares here in this post.
Ok now let me detail the procedure...


Once the project is created, you would have the layout of the project as given in the image below...


Once the portlet is created the project layout should look something like the image given below...


Please make a note of creating the resources folder under src/testIntegration/
once done the complete build.gradle of the plugin should look something like the one given below..

1. HelloWorldService.java an interface
2. HelloWorldServiceImpl.java an implementation of HelloWorldService.java
We all set now to execute the testIntegration command....

the above command execution would automatically pull the liferay portal and dump it under the folder bundles folder of the project, the bundles folder would be created by the testIntegraton command, the folder can be viewed as given in the image below...

the result of the testIntegration command would appear something like the one given in the image below...

Do not be panic this is the result of missing JMX configuration that we have to set in the tomcat container....
soon after you update the setenv.sh file the entire file should appear something like the one mentioned in the image given below...

Run the testIntegration command again, if everything goes well fine else you would end in an error as said in the image below...

The above error is due to the installation of the plugin by the previous testIntegration command run...
Just delete the plugin which you find under the folder bundles/osgi/modules

rerun the testIntegration command again...
Now you should have your test executed and results success....

Hurray, we have successfully configured and executed the integration test.... well this concludes the post
Hope you had great learning....
Let me have your comments in the comments section about your try....
Thanks.
In this post I am going to discuss about how to use arquillian extension to perform integration testing on liferay plugins...
The following sections details the softwares used...
| Prerequisites | |||
|---|---|---|---|
| Name | Version | Download Page | Direct Link |
| Java | 1.8 | Java Download Page | N/A |
| Mysql | 8.0.20 | N/A | N/A |
| Liferay Portal | 7.3.0 - CE | Lifeay Portal Download Page | Click to Download Directly |
| IntelliJ IDE | 2019.3.5 | N/A | N/A |
The environment where the above mentioned softwares were installed had fedora as operating system but the procedure that I am going to detail here is not restricted to any particular operating system and also I am not going to discuss the installation of above mentioned softwares here in this post.
Ok now let me detail the procedure...
Creating a Liferay Project using Intellij IDE
Open up your IntelliJ IDE and create a project as given in the image below...

Once the project is created, you would have the layout of the project as given in the image below...

Creating a mvc portlet
Create a simple mvc portlet as directed by the images below...


Once the portlet is created the project layout should look something like the image given below...

Creating testIntegration folder
Expand the portlet we have just created and create a folder called testIntegration under src folder, to have a reference use the image below...
Please make a note of creating the resources folder under src/testIntegration/
Updating build.gradle of the plugin
Open up the build.gradle of the plugin and append the following in dependency closure...
testIntegrationCompile group: "com.liferay.arquillian", name: "com.liferay.arquillian.arquillian-container-liferay", version: "1.0.6"
testIntegrationCompile group: "junit", name: "junit", version: "4.12"
testIntegrationCompile group: "org.jboss.arquillian.junit", name: "arquillian-junit-container", version: "1.1.11.Final"
testIntegrationCompile group: "junit", name: "junit", version: "4.12"
testIntegrationCompile group: "org.jboss.arquillian.junit", name: "arquillian-junit-container", version: "1.1.11.Final"
once done the complete build.gradle of the plugin should look something like the one given below..

Creating service classes
for our discussion, I have created two class files under src/main/java/1. HelloWorldService.java an interface
2. HelloWorldServiceImpl.java an implementation of HelloWorldService.java
public interface HelloWorldService {
public String greetTheWorld();
}
public String greetTheWorld();
}
import org.osgi.service.component.annotations.Component;
@Component(immediate = true, service = HelloWorldService.class)
public class HelloWorldServiceImpl implements HelloWorldService {
@Override
public String greetTheWorld() {
return "Hello World";
}
}
@Component(immediate = true, service = HelloWorldService.class)
public class HelloWorldServiceImpl implements HelloWorldService {
@Override
public String greetTheWorld() {
return "Hello World";
}
}
Creating arquillian.xml file
Under the testIntegration/resources folder create a xml file called arquillian.xml and paste the contents given below...
<?xml version="1.0" encoding="UTF-8"?>
<arquillian xmlns="http://jboss.org/schema/arquillian"
xmlns:xsi="http://www.w3.org/2001/XMLSchema-instance"
xsi:schemaLocation="http://jboss.org/schema/arquillian http://jboss.org/schema/arquillian/arquillian_1_0.xsd">
<engine>
<property name="deploymentExportPath">build/deployments</property>
</engine>
</arquillian>
Creating Integration Test classes
Under testIntegration/java create a Integration test class to the service the service we have implemented...
import com.helloworld.service.HelloWorldService;
import com.helloworld.test.HelloWorldTestHelper;
import com.liferay.arquillian.containter.remote.enricher.Inject;
import com.liferay.portal.kernel.exception.PortalException;
import java.io.File;
import java.io.FileOutputStream;
import java.io.IOException;
import java.nio.file.Files;
import java.nio.file.Path;
import java.nio.file.Paths;
import org.jboss.arquillian.container.test.api.Deployment;
import org.jboss.arquillian.junit.Arquillian;
import org.jboss.shrinkwrap.api.ShrinkWrap;
import org.jboss.shrinkwrap.api.spec.JavaArchive;
import org.junit.Assert;
import org.junit.Test;
import org.junit.runner.RunWith;
@RunWith(Arquillian.class)
public class HelloWorldIntegrationTest {
@Deployment
public static JavaArchive create() throws Exception {
final File tempDir = HelloWorldTestHelper.createTempDir();
String gradlew = "../../gradlew";
String osName = System.getProperty("os.name", "");
if (osName.toLowerCase().contains("windows")) {
gradlew = "../../gradlew.bat";
}
final ProcessBuilder processBuilder = new ProcessBuilder(
gradlew, "jar", "-Pdir=" + tempDir.getAbsolutePath());
final Process process = processBuilder.start();
process.waitFor();
Path jarFilePath = Paths.get("build/libs/com.helloworld-1.0.0.jar");
Files.copy(jarFilePath, new FileOutputStream(
tempDir.getAbsolutePath() +
"/com.helloworld-1.0.0.jar"));
final File jarFile = new File(
tempDir.getAbsolutePath() +
"/com.helloworld-1.0.0.jar");
return ShrinkWrap.createFromZipFile(JavaArchive.class, jarFile);
}
@Test
public void testGreetTheWorld() throws IOException, PortalException {
final String result = _helloWorldService.greetTheWorld();
Assert.assertEquals("Hello World", result);
}
@Inject
private HelloWorldService _helloWorldService;
}
import java.io.File;
public class HelloWorldTestHelper {
private static final int TEMP_DIR_ATTEMPTS = 10000;
public static File createTempDir() {
File baseDir = new File(System.getProperty("java.io.tmpdir"));
String baseName = System.currentTimeMillis() + "-";
for (int counter = 0; counter < TEMP_DIR_ATTEMPTS; counter++) {
File tempDir = new File(baseDir, baseName + counter);
if (tempDir.mkdir()) {
return tempDir;
}
}
throw new IllegalStateException("Failed to create directory within "
+ TEMP_DIR_ATTEMPTS + " attempts (tried "
+ baseName + "0 to " + baseName + (TEMP_DIR_ATTEMPTS - 1) + ')');
}
}
We all set now to execute the testIntegration command....
Executing testIntegration command
From you IDE, select the Gradle tab and fire the command testIntegration as given in the image below...
the above command execution would automatically pull the liferay portal and dump it under the folder bundles folder of the project, the bundles folder would be created by the testIntegraton command, the folder can be viewed as given in the image below...

the result of the testIntegration command would appear something like the one given in the image below...

Do not be panic this is the result of missing JMX configuration that we have to set in the tomcat container....
Setting JMX Configuration in Tomcat Conatiner
Open the file setevn.sh under bundles/tomcat-9.0.17/bin and append the file with the following content
JMX_OPTS="-Dcom.sun.management.jmxremote -Dcom.sun.management.jmxremote.authenticate=false -Dcom.sun.management.jmxremote.port=8099 -Dcom.sun.management.jmxremote.ssl=false"
CATALINA_OPTS="${CATALINA_OPTS} ${JMX_OPTS}"
CATALINA_OPTS="${CATALINA_OPTS} ${JMX_OPTS}"
soon after you update the setenv.sh file the entire file should appear something like the one mentioned in the image given below...

Updating portal-ext.properties
Open up portal-ext.properties file under bundles/portal-ext.properties and modify the properties as given...
include-and-override=portal-developer.properties
#
# MySQL
#
jdbc.default.driverClassName=com.mysql.cj.jdbc.Driver
jdbc.default.url=jdbc:mysql://localhost/lportal?useUnicode=true&characterEncoding=UTF-8&useFastDateParsing=false
jdbc.default.username=root
jdbc.default.password=admin
#
# MySQL
#
jdbc.default.driverClassName=com.mysql.cj.jdbc.Driver
jdbc.default.url=jdbc:mysql://localhost/lportal?useUnicode=true&characterEncoding=UTF-8&useFastDateParsing=false
jdbc.default.username=root
jdbc.default.password=admin
Run the testIntegration command again, if everything goes well fine else you would end in an error as said in the image below...

The above error is due to the installation of the plugin by the previous testIntegration command run...
Just delete the plugin which you find under the folder bundles/osgi/modules
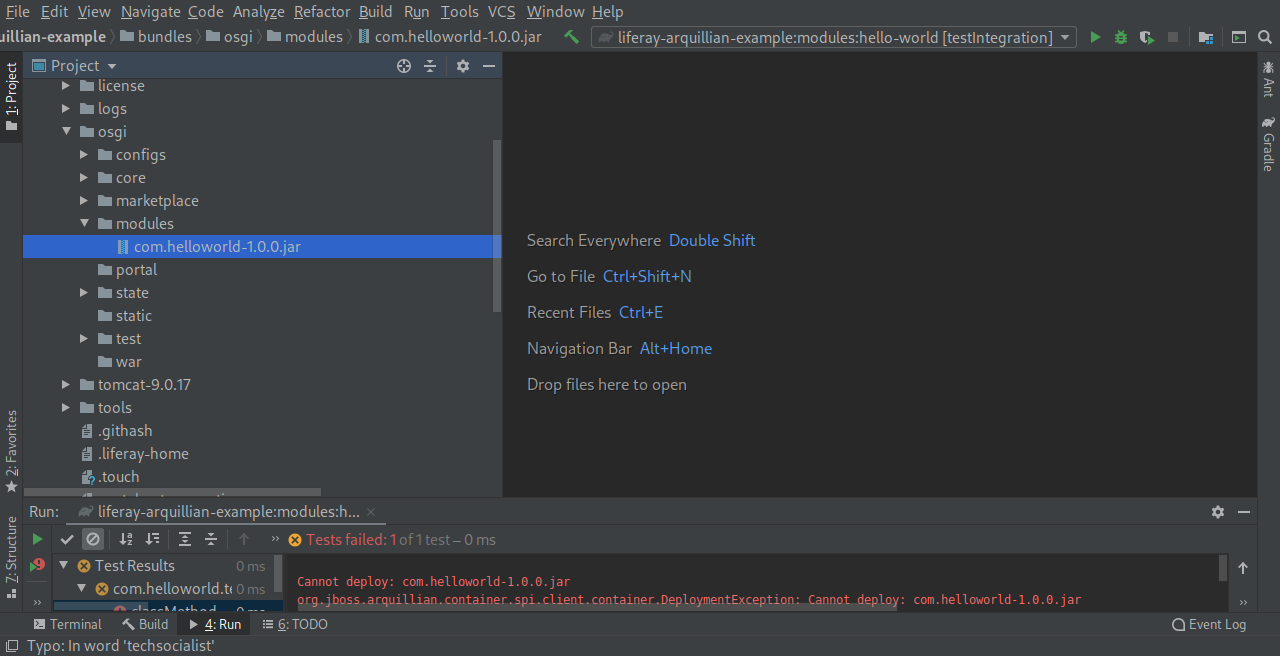
rerun the testIntegration command again...
Now you should have your test executed and results success....

Hurray, we have successfully configured and executed the integration test.... well this concludes the post
Hope you had great learning....
Let me have your comments in the comments section about your try....
Thanks.


No comments:
Post a Comment